Monday 18 June 2012

Schematic for wireless sensor node

I just added a schematic for my wireless sensor node to my github.  If you actually want to build one of them then it'd come in handy.  Next time I build a node I'll try to put together a step-by-step for the build on stripboard.


The TMP36 is driven directly by the ATTiny so that it can be powered down when not in use. The 0.1uF capacitor smoothes the power to the TMP36, increasing its accuracy.

The transmitter is powered via a basic NPN switching transistor (any similar part would do as long as it can sink the current for the transmitter). The 10uF cap provides for the transient high current used for transmission. The 2k resistor prevents too much current from flowing through the base to the emitter of the transistor (it only takes a small current to saturate the transistor so any extra current isn't helpful and can be harmful).

Sunday 17 June 2012

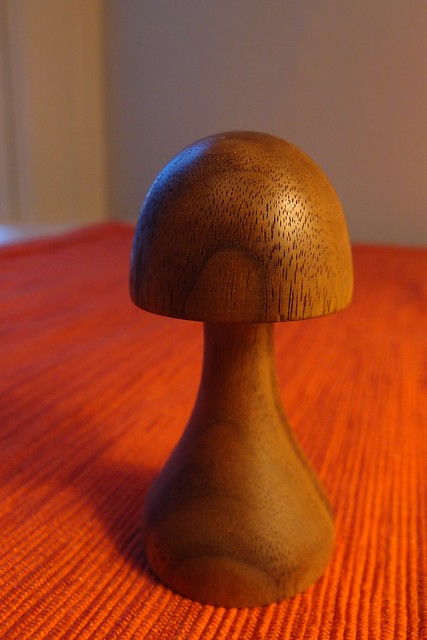
Mushroom two

This was my second attempt at turning a mushroom on the lathe.  This time I used walnut, which was much nicer to work with than the softwood I was practicing with last time.

  Mushroom two

I used the same sequence of steps as for mushroom one, except this time I remembered to leave some room between the tenon (which fits in the bowl chuck) and the base.  That allowed me to shape the base while still on the lathe and then part it off.  On my previous attempt, I didn't leve enough space so I ended up sanding off the tenon on the belt sander instead -- not nearly as fun.

Also. I had a go with the skew chisel in a couple of places.  When it's cutting correctly, it makes a really smooth surface.  Looks like it'll be worth the effort to learn to use it.

Overall, pretty pleased with this one, I only got a few small tear outs on the outside of the cap.

Sunday 10 June 2012

Sensor receiver enclosure

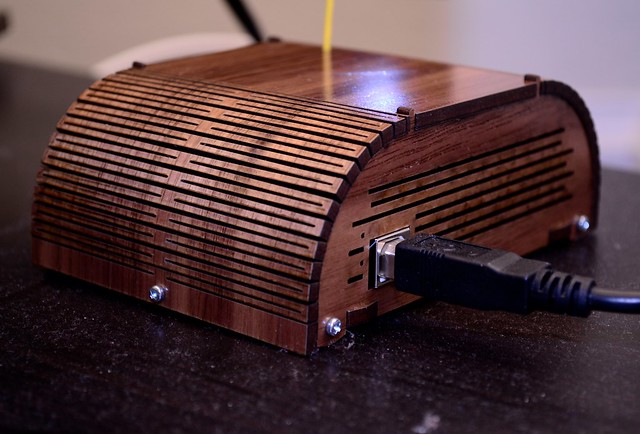
Arduino radio enclosure

I've previously blogged about my wireless sensor node project and the little boxes I made for the sensor nodes themselves.  Today, I made an enclosure for the receiver node, which houses an Arduino and a radio receiver.  It sits under the TV, by our wifi router, so it needs to look nice; walnut plywood and a nice kerf bend seem to do the trick.

The construction is just a scaled-up version of the smaller boxes, with a hole cut for the USB port that powers the system and reports the telemetry.

Arduino radio enclosure (rear)

The design is open-source, under the CC-BY-SA license.

Sunday 3 June 2012

Mushroom one


I took a basic wood turning safety class last weekend and I'd been itching to give it a real go ever since.  As recommended by the class tutor, I picked up some inexpensive dimensional lumber to experiment with.

Here's my take on it:
  • Turning's a lot of fun.
  • It's hard to get a smooth surface and I didn't come close on the mushroom cap.
  • Wood gets amazingly smooth and shiny if you sand all the way from 120 grit to 1500 grit.  The lathe makes it easy to do so.  I used a palm sander with the lathe spinning to remove tool marks.
  • Getting started, it takes a long time to turn a piece.  This modest little mushroom took me four hours.
Technique-wise here's how I made the mushroom:
  • Turning between centres, I roughed out a piece of douglas fir (cheap dimensional lumber).
  • I turned most of the cap using spindle gouge and scraper.
  • Used the parting tool to make an incision below the cap.
  • Removed a lot of material around the stem.
  • Deepened the incision with the parting tool.
  • Repeat, shaping the stem with spindle gouges.
  • Used the parting tool to cut a tenon on the bottom of the stem.
  • Put the tenon in a chuck to turn the rest of the cap and smoothed as best I could using the scraper.
  • Sand 120 grit using palm sander.
  • Sand 220 grit.
  • Sand 300 grit.
  • Sand 400 grit.
  • Sand 600 grit.
  • Sand 800 grit.
  • Sand 1500 grit.
  • Applied some beeswax from a block and buffed with a rag.
  • Cut off the tenon with the band saw.  Don't do what I did and just try to hold the mushroom to the fence, make sure you put a sacrificial block under the stem of the movement of the saw will pull the stem down.
  • Sanded the base flat using the belt sander.  Ditto on using a sacrificial block.